Performing Your Show
Tapping on a show in the home screen opens that show in the player. From there, your show can be played from start to finish just by tapping the GO button. When you first open a show, the first cue is selected, and tapping GO will start that cue. If you tap a different cue, that cue will become selected and GO will start that cue.
The GO Button

Tapping GO triggers an action on the selected cue. By default, a cue only has one action, which is to start playing. Once a cue begins playing, if any additional Go Actions are enabled, the cue remains selected until all of its Go Actions have been triggered or are no longer valid. These can include actions like Exit Loop, Fade Out/Stop Cue, and Stop/Go Next. After all Go Actions have been triggered (or if none were ever enabled), the next cue is automatically selected.
Important: You can configure the trigger mode of the GO button in the Sidebar > Preferences. The default setting is “Touch Up” which means the GO will happen when you release your finger from the button. Using this setting, you can place your finger on the button and hold it there to standby, then release the button at the right moment to start the cue. To get a faster response time for the GO button, you can change the trigger mode setting in Preferences to “Touch Down”. Please note that this setting is only relevant to the on-screen GO button; remote controls and Bluetooth keyboards respond to button presses, not releases. Also it’s important to know that the trigger mode for the Pause/Stop button is always “Touch Down”.
The text of the GO button changes to reflect the cue number and the action that will be performed on the next tap. When the selected cue changes, the GO button text updates to show the action it will perform and the new target cue number.
By default, the GO button is positioned in the top-right corner of the show player screen. In the Sidebar > Preferences, you can choose one of four positions for the button that best suits your workspace: left or right, and top or bottom.
When the “Go Button Defaults” profile is the active remote control profile, the iOS remote commands Play and Toggle Play/Pause will trigger a GO. When a Bluetooth keyboard is attached, GO can also be triggered by spacebar, return, enter, and right arrow keys. These default mappings can be customized by creating and editing your own remote control profile in the Sidebar > Configure Remote Control.
GO also resumes a show that is paused.
The Pause / Stop Button
By default, the Pause button displays next to the GO button. Tapping this button pauses all cues and hits that are currently playing. This button is active only when at least one cue or hit is playing.
When a show is paused, Pause changes to the Stop button and GO becomes Resume. You can also press and hold (long press) on the Pause button to stop your show. When a show is paused, all active cues glow yellow. You can resume your show by tapping Resume, or playing a cue or hit.

In the Sidebar > Preferences, you can choose to instead display the Stop button in this position. If you’ve chosen to display Stop, a long press will pause your show.
After stopping a show, the show timer will restart again from the value set in Show Settings > Elapsed Timer Start Time when the next cue or hit that has its Elapsed Timer Action set to “RESUME” starts playing.
Elapsed Show Timer
The Elapsed Show Timer starts running whenever a cue or hit with its Elapsed Timer Action set to “RESUME” starts playing. The timer continues until the last cue of the show finishes playing, until a cue or hit with its Elapsed Timer Action set to “STOP” begins playing, or until you tap the Stop button.
Tapping Pause also pauses the Elapsed Show Timer. When paused, the show timer glows yellow. The Elapsed Show Timer resumes when the show resumes.
Long-press to manually start the timer. Long-press on a running show timer to stop the timer and reset the elapsed time. Swipe left and right on the show timer to toggle between Elapsed Show Time and Wall Clock Time. On iPad in Full Screen Mode, you can optionally show or hide the Elapsed Show Time and Wall Clock Time individually.
Remote control, OSC, and MSC commands that panic, stop, pause, or start cues also interact with the timer accordingly. In addition, you can manually control the timer using OSC commands. You can read more about these OSC commands in the documentation section OSC Dictionary.
The Selected Cue
In Show Mode, the selected cue appears highlighted, and the GO button text updates with the action it will perform on the selected cue when it is tapped. Each GO triggers the next action on the currently selected cue.
Tapping any cue will select it. Only one cue at a time can be selected. Cues can be re-selected after they start playing. Cue 1 is automatically selected when you open your show.
Tapping on the selected cue will trigger a GO, just as if you had tapped the GO button.
The Main Volume Control
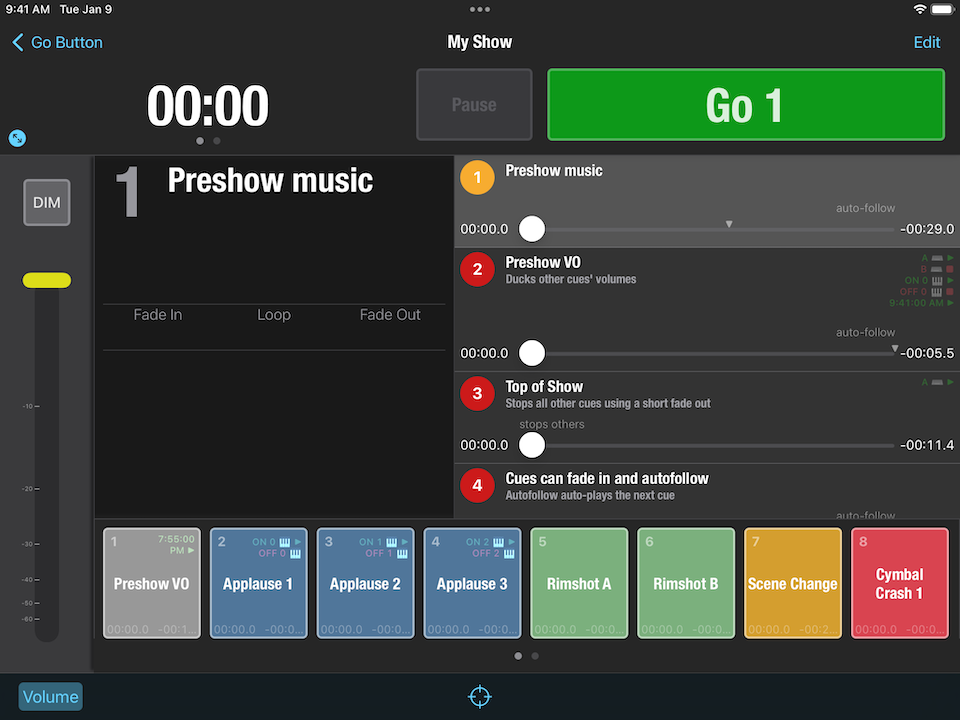
Tapping Volume in the lower left corner of the screen will open the main volume control for Go Button. You can also two-finger swipe anywhere outside of the hits panel to toggle the visibility of volume control.
In most cases, you’ll see a slider which ranges from 0 dB (full volume) to -96 dB (silent), with a Dim button above it. In layouts with limited vertical space (i.e. an iPhone or iPod touch in landscape orientation), a Mute button will appear in place of the volume slider.
The main volume level for your show resets to 0 dB every time you open your show. Adjustments to the main volume made here apply to all sound coming from Go Button, and remain in effect even if you hide the main volume control. It’s important to note, however, that the main volume control does not actually adjust the saved volume of your cues or hits. Those levels are safely stored, and only change when you change them in Cue or Hit Edit.
Tapping DIM automatically and gracefully reduces the volume by the value set in Show Settings > Main Volume Dim (dB). A second tap will restore the slider to its previous position. If you manually move the volume slider while “Dim” is engaged, it automatically disengages. You can customize the duration of the fade in Show Settings > Main Volume Dim Duration. In a new show, the default Main Volume Dim reduction value is -20 dB, and the default Main Volume Dim Duration is 00:01.0.
Full Screen Mode
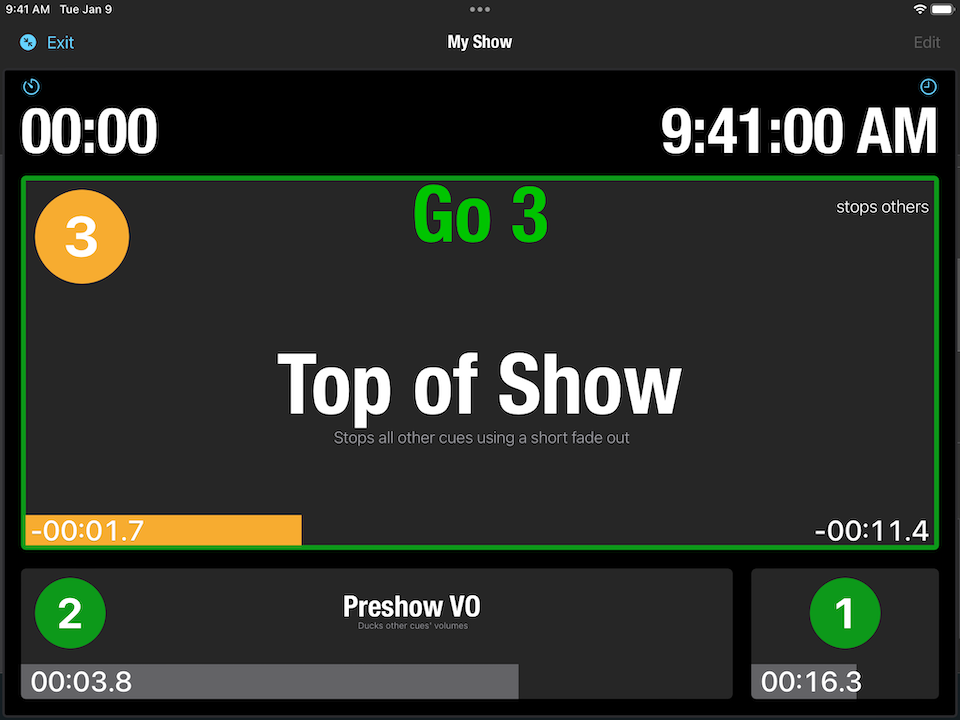
On iPad, you can open Full Screen Mode by tapping on the blue “expand” button located near the Elapsed Show Timer. Full Screen mode prominently displays the Elapsed Show Timer, a Wall Clock, and the currently selected cue. In addition, up to three of the most-recently played cues are displayed across the bottom of the screen.
Everything in this mode is designed to make it easy to see your show when your device is far away. For example, this mode is useful when you are using a remote control and your device is off-stage connected to the sound system.
While primarily designed for when using remote controls, Full Screen Mode also supports a few touch gestures:
- Tap on the selected cue to trigger a GO.
- Swipe left or up on the selected cue to select the next cue.
- Swipe right or down on the selected cue to select the previous cue.
- Tap on any of the other cues to select that cue.
You can also swipe to hide the Elapsed Show Time and/or Wall Clock Time individually. Swipe again to show one or both clocks, or tap the corresponding blue button.
To dismiss Full Screen Mode, tap the Exit button in the upper left corner of the screen or anywhere outside of an active cue.
Resize Mode
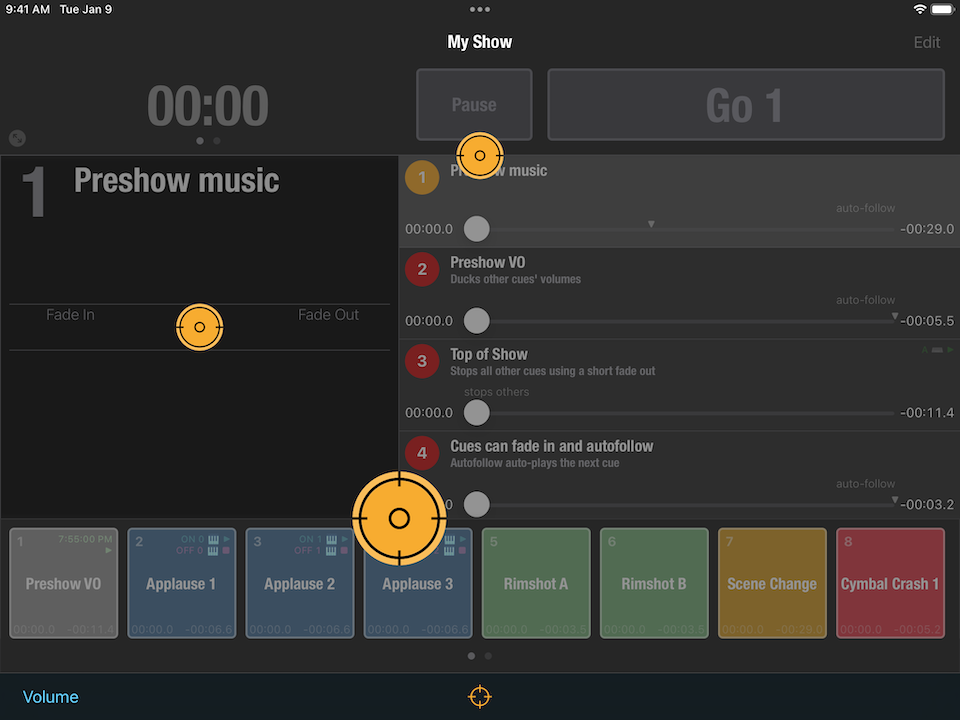
Tapping the “target” button at the bottom center of the screen will display yellow circular controls called Resize Handles. On iPhone, there is one Resize Handle. On iPad, there are three resize handles, and they all behave in much the same way.
Resize Handles can be used to set the relative size of the various segments of the interface to suit your taste and your needs. On iPhone and iPod touch, you can change the relative size of the cue list and the GO and Pause or Stop buttons. On iPad, you can also adjust the relative size of the Notes area and the hits panel.
When you’re finished with your adjustments, tap the “target” button at the bottom center screen again to hide the Resize Handle(s).
Adjustments made in Resize Mode are automatically saved in your show. If you share your show to another device, it will open on that device with the same layout proportions as on your current device.
Hits
On iPhone and iPod touch, hits can be accessed by tapping Hits in the lower right corner of the screen. On iPad, hits are always visible below the cue list and the Notes area, unless of course you’ve elected to hide them with the Resize Handle.
Each show can have up to 96 hits. The number of hits visible on a single page is determined by the size of the hits panel. Resizing the hits panel flows the layout of hits accordingly.
Tap a hit to start it. Long press on a hit to stop it immediately.
Alternately, you can long-press on a hit to start it and release to stop. If your hit has a Fade Out Time configured, releasing will fade out for that duration before stopping.
Still have a question?
Our support team is always happy to help.