Editing Cues
Tapping on a show in the home screen opens that show in the player. From there, tapping GO will start your first cue. To edit your show, that is to say, to add or remove cues and hits, or to change their names, target audio files, or other properties, you can tap Edit in the upper right corner of the screen to enter Edit Mode.
In Edit Mode, you can:
- Reorder by dragging the handle on the right side of each cue up or down.
- Duplicate by selecting one or more cues, tapping the “gear” menu button, and then selecting “Duplicate Cues”.
- Delete by selecting one or more cues and then tapping the “trash can” menu button.
- Add by scrolling to the end of the cue List and tapping ”+ Add Cue”. Alternately, you can select an existing cue and tap the ”+” menu button (in the navigation bar or toolbar) to insert a new cue at that position in the cue list. On iOS 11 and newer, you can drag and drop audio files from the “Files” app in iPad Split View directly into your cue list. This both imports the audio files (if needed) and creates a new cue for each file in a single drop action.
- Edit by selecting one or more cues and then tapping the “edit” menu button (a rectangle with a pencil). Note that if you select multiple cues to edit simultaneously, batch edit will only update the settings enabled with a blue checkmark. The values of any settings that are not enabled will remain unchanged.
When the player is in Edit Mode, selecting a cue and tapping the “edit” button opens the Cue Edit screen. This screen contains all the settings that tell Go Button exactly how you want that cue to behave when it plays. When you’re done editing a cue, tapping the Save button in the upper right corner of the screen will save your changes and return you to the cue list still in Edit Mode. Tapping Cancel also dismisses the Cue Edit screen but any changes you made to your cue are not saved.
When you’re all done editing your show, tapping the Done button in the upper right corner of the screen will return you to Show Mode.
Cue Edit
Title and Subtitle
Title and Subtitle text help you visually identify a cue during playback. Titles can also be used to communicate basic instructions to the show operator.
If the title field is left blank, Go Button will construct a default title using the media file name or Music library track. If you enter a title but leave the subtitle blank, then the subtitle will display the media file name or track title.
Notes (iPad only)
When a cue is selected, its notes are displayed in the cue Info panel. You can use notes to communicate detailed instructions to your show operator.
Media File
Choose Media
Tap to open the Media Picker to select or change the media file. Long-press on a cue’s current media file to Clear Media File. Empty cues — cues without media files — can be used to perform actions like Stop Others or Duck Others, and at any time you can assign a new media file to an empty cue.
The media file name is displayed when a file is selected. Music library tracks also display their album name and artwork. If Go Button cannot locate a media file, the title will also say (missing).
Go Button renders a waveform image for each media file the first time it is displayed in Cue Edit. This is a background process that happens only once per file. You can continue to work while the image renders. Once the process is complete, Go Button caches the image so that it can be displayed instantly the next time you open any cue which uses that same audio file.
Tapping the Preview button below the waveform image will play your cue using its current settings.
Tapping the Fades button will enable or disable the optional integrated fade in and fade out editing handles. Dragging the fade handles left and right will set the fade in and fade out times. Fade times can also be edited numerically below.
Volume (dB)
Drag the volume slider to adjust the cue volume from -∞ dB up to +12 dB. Cue volumes are relative to your media file’s original volume.
You can tap on the numeric value to manually enter a volume in decibels.
Entering a volume of -96 dB or lower is constrained to silent (-∞ dB). Entering a volume greater than 12 dB is constrained to 12 dB.
Pan
Drag the pan slider to adjust the left-to-right audio output.
You can tap on the numeric value to manually enter a pan value from -100 (full left) to 100 (full right). A value of 0 outputs equally on the left and right channels.
Playback Rate (%)
You can adjust the playback rate from 25% (1/4x) to 400% (4x).
The Rate changes pitch toggle lets you choose between shifting the pitch along with the speed or not.
Start Time / End Time
Set these values to determine the region of the media file that you want to play.
The End Time defaults to the current media file’s total duration. The End Time cannot be earlier than the Start Time.
Dragging the trim handles in the Visual Editor also updates the numeric Start Time/End Time values.
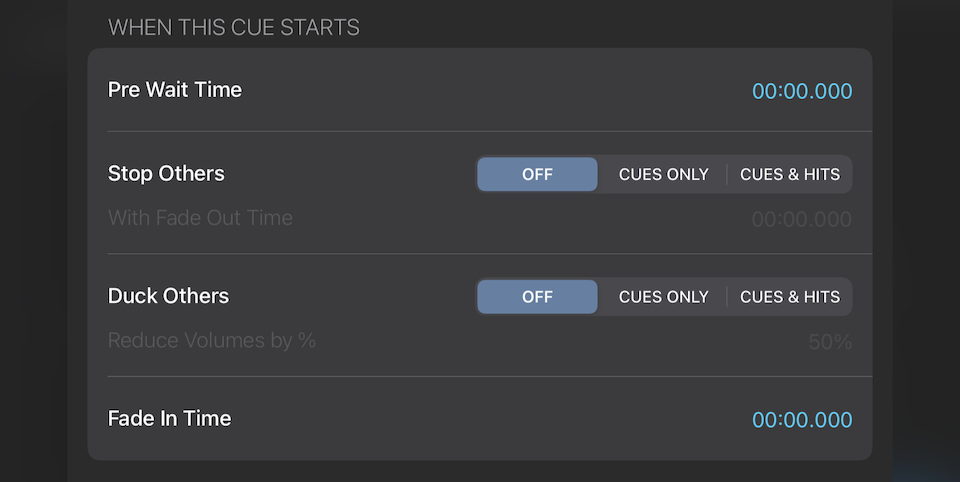
When This Cue Starts
Settings in this section pertain to the moment the cue starts playing.
Pre Wait Time
Entering a time here will delay the start of a cue by that amount of time, every time is it started. So, for example, if you entered 00:03 here, three seconds will elapse between pressing GO and the actual start of the cue.
Stop Others
Use Stop Others to indiscriminately interrupt all other cues when this cue is started. For example, you can have a cymbal crash perfectly interrupt a drum roll at just the right moment or ensure that you never have more than one cue playing at a time.
You can select the option to either stop other cues only or to stop all other cues and hits.
Optionally, you can set a time in the With Fade Out Time field to gracefully fade out and stop all other cues (or cues and hits).
Duck Others
Use Duck Others to ensure a cue can be heard clearly when playing over the top of another cue. For example, use it to lower the volume of a preshow music cue when you play a voiceover cue.
You can select the option to either duck other cues only or to duck all other cues and hits.
You must also set the percentage by which you wish to reduce the volume of the other cues. The percentage is relative to each cue’s current volume. For example, setting the value to “1%” would be a very small reduction and result in almost no change in volume. Setting to “99%” would reduce the volume of the other cues to almost silent. Anywhere between “50%” to “75%” is usually a good starting point depending upon how loud your other cues are.
The most recent cue that begins playing with Duck Others enabled will play at full volume. When that cue finishes playing, the volumes of all other cues that are currently playing will restore back to their original volumes.
Fade In Time
You can set a time over which Go Button will fade in this cue every time it is started. Editing the time here will change the fade in envelope shown on the waveform, and vice versa.
The “Fade In Time” can be longer than the total cue duration. The player intelligently constrains all fade times as needed during playback.
Elapsed Show Timer
Elapsed Timer Action
You can optionally stop or resume the Elapsed Show Timer each time a cue begins playing. If the show timer is already running, the “Resume” action has no effect.
Timer Duration
You can also optionally change the duration of the Elapsed Show Timer. For example, if you have an earlier cue that is your Preshow music, you may wish to reset the timer back to “00:00” when your “Top of Show” cue begins playing.
- No Change. Leave the timer duration and elapsed time unchanged.
- Reset. Reset the timer to the default starting time specified in Show Settings > Elapsed Timer Starting Time.
- Custom. Set the timer to the time specified. A value of “00:00” causes the timer to count up from zero. A value greater than “00:00” causes the timer to count down from that time.
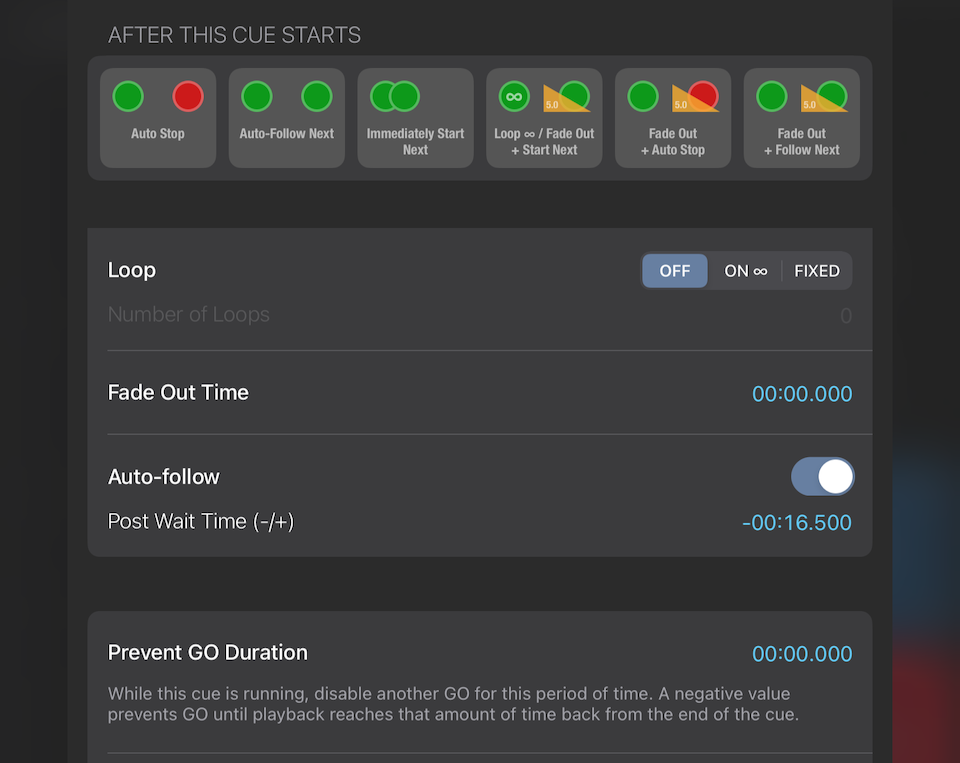
After This Cue Starts
Settings in this section pertain to various moments after the cue starts playing.
Cue Presets
Go Button gives you six buttons which let you quickly apply common settings to your cue. After you tap a preset, you can still manually fine-tune all of the settings.
Auto Stop
This preset resets a cue to its default behavior. When the cue completes, Go Button will wait for you to press GO again before starting the next cue.
Auto-Follow Next
This preset enables the Auto-follow switch, which causes Go Button to automatically start playing the following cue when this cue completes. A series of cues configured using this preset will behave much like a playlist in the Music app.
Immediately Start Next
This preset also enables the Auto-follow switch, but in addition sets the “Post Wait Time (-/+)” value to a really large negative time value (“-1 hour”). This causes Go Button to immediately trigger Auto-follow when this cue starts, which in turn starts playing the following cue at the same time. (When a cue begins playing, a negative Post Wait Time causes the following cue to begin playing before the end of the current cue. If a negative Wait Time is longer than the duration of the cue itself, the Auto-follow is triggered immediately when the cue begins playing.)
Loop ∞ / Fade Out + Start Next
This preset enables the Loop option set to “Infinite” and adds a “Fade Out / Go Next” Go Action with a fade duration of 5 seconds. This causes the cue to loop infinitely once started, until the next GO. At that moment, the Go Action will begin to fade out the current cue and at the same time start playing the next cue.
The preset button defaults the length of the fade out to 5 seconds, which can be adjusted in the Go Actions screen.
Fade Out + Auto Stop
This preset sets the Fade Out Time to 5 seconds and adds a “Fade Out / Stop Cue” Go Action also with a 5 second duration. These settings cause the cue to behave in one of two ways:
- If you start the cue and then do nothing, the cue will complete by fading out at its end.
- If you press GO while the cue is still playing, then the Go Action will fade out and stop the cue at that moment.
In either case, Go Button will wait for you to press GO again before starting the next cue.
Note that the Fade Out Time duration can be edited separately from the fade duration of the Go Action. This is useful for cases where you might want a cue to fade out slowly if there is enough time for it to play to completion, but also want the option to fade out very quickly on-demand by pressing GO.
Fade Out + Follow Next
This preset also sets the default Fade Out Time to 5 seconds, but adds a “Fade Out / Go Next” Go Action also with a duration of 5 seconds. In addition, this preset enables “Auto-follow” to fire 5 seconds before the end of the cue. These settings cause the cue to behave in one of two ways:
- If you start the cue and then do nothing, the cue will complete by fading out at its end. At the same time the fade out begins, Go Button automatically will start the next cue.
- If you press GO while the cue is still playing, then the Go Action will fade out and stop the cue at that moment and at the same time will start playing the next cue.
Loop
You can set cues to not loop, to loop a fixed number of times, or to loop infinitely until stopped.
Cues loop their entire duration, from their Start Time to their End Time.
Infinite loops play until a GO triggers either the Exit Loop Go Action or a different action which causes the cue to stop. Fixed loops automatically exit after the loop count specified in Number of Loops is reached. The Exit Loop Go Action will also exit a fixed loop.
If you have a media file with multiple regions you wish to loop, simply create a separate cue for each region. Use the same file for each cue, and trim the start and stop times to play just one loop region each. Then turn on Auto-follow in each cue to make them play seamlessly from one loop region to the next.
Fade Out Time
Setting a Fade Out Time will add a fade out of that duration to the end of the cue. Editing the time here will change the fade out envelope shown on the waveform, and vice versa.
The “Fade Out Time” can be longer than the total cue duration. The player intelligently constrains all fade times as needed during playback.
Auto-follow
You can have the next cue start automatically when this cue ends by turning on Auto-follow.
Optionally, you can also enter a Post Wait Time to offset the start of the following cue.
- Set a negative value to play the next cue early, causing the two cues to overlap.
- Set a positive value to delay the start of the next cue, resulting in silence between the two cues.
Auto-follow will not trigger while a cue is looping or if the next cue is already playing.
Prevent GO Duration
A cue can prevent another GO from being triggered for a set amount of time while the cue is running.
If you specify a positive duration, another GO is prevented from being triggered for that amount of time after the cue begins playing. If you specify a negative duration, this prevents another GO until that many seconds back from the end of the cue.
For example, a value of 00:10.000 prevents another GO for only the first 10 seconds after the cue starts, while entering -00:30.000 prevents another GO until the final 30 seconds of the cue, at which point the cue will allow the GO window to reopen once again.
If this cue stops playing at any time, its effect on the “Double-GO Window” is removed, regardless of whether or not the amount of time had elapsed or not.
This setting works in conjunction with the show setting Min. Seconds Between Each GO and lets you further customize on a cue-by-cue basis the window of time in which another GO is allowed. Note that the longer of the two durations “wins”. That is to say, if your show already has a value set for Min. Seconds Between Each GO, the Prevent GO Duration setting will only have an effect if it is set to a longer duration.
Go Actions
After a cue starts playing, you can trigger additional actions with that cue before moving on to the next cue in your show. These actions include the following:
| Value | Subvalue | |
|---|---|---|
| Exit Loop | — | — |
| Fade Out / Stop Cue | Fade Out duration | — |
| Fade Out / Pause Cue | Fade Out duration | — |
| Fade Out / Go Next | Fade Out duration | — |
| Fade to % | Final volume as % of cue volume | Fade duration |
| Fade to dB | Final volume in absolute decibels | Fade duration |
| Fade & Stop Others | Duration of fade out before stopping others | --- |
| Stop Cue | — | — |
| Stop Cue / Go Next | — | — |
| Stop Others | — | — |
| Custom | (see below) | (see below) |
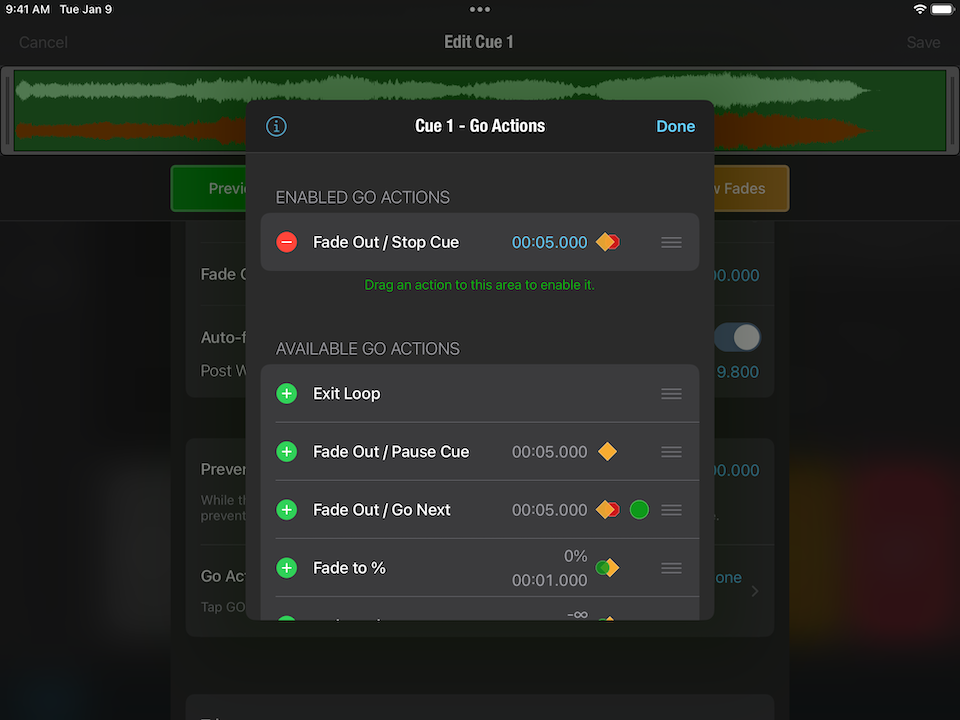
To add one or more Go Actions to a cue, tap Go Actions to open the selection screen.
You can tap the green ”+” button or drag the reorder handle of a Go Action to move it from the Available Go Actions section to the Enabled Go Actions section. If any of the Go Actions have editable parameters, such as level or time, those can be edited when the Go Action is enabled. To remove an action, drag the reorder handle to remove it from the “Enabled” section, or tap the red ”-” button and then tap Remove to confirm.
When you’re done, tap Done in the top left corner of the screen to return to editing the cue. Changes made to Go Actions will only save when you save the changes to the cue as a whole. Tapping Cancel in Cue Edit discards all changes you may have made to your cue, including which Go Actions are enabled or their order.
Certain actions may be enabled but end up not being relevant to the current cue settings or playback state. For example, an Exit Loop Go Action will be ignored and skipped over during playback if Loop is turned off for that cue. These ignored actions will appear dimmed in the Go Actions section.
The actions “Fade to %” and “Fade to dB” also resume a show that is paused. To fade without an implicit “resume” behavior, use the custom versions of these actions which do not implicitly resume the target cue.
You can tap the “i” button in the upper left corner of the selection screen for a brief explanation of Go Actions.
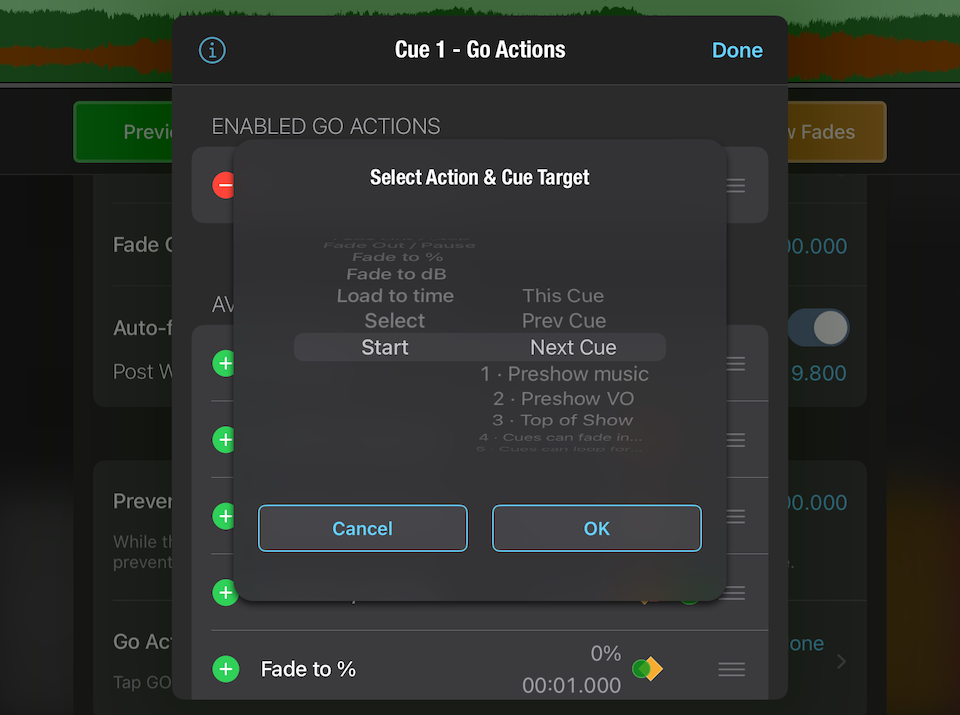
“Custom” Go Actions
The “Custom” Go Action provides more options useful for advanced programming. In addition to the actions that can be performed by regular Go Actions, Custom Go Actions also offer “Load to Time”, “Select”, and “Start” actions. You can also specify which cue the action should target: “This Cue”, “Previous Cue”, “Next Cue”, “All Cues”, “All Hits”, or any specific cue in the cue list.
- Load to time. Set the cue targeted by this action to a particular time before starting the cue. Then when that cue is started, it will begin playing from that time. If the target cue is already playing, this action has no effect.
- Select. The cue targeted by this action will become selected, changing the current playback position of your cue list, i.e. the cue that will be triggered by the next GO.
- Start. The cue targeted by this action will begin playing, regardless of whether or not that cue is the current playback position. If the target cue is already playing, this action has no effect.
Triggers
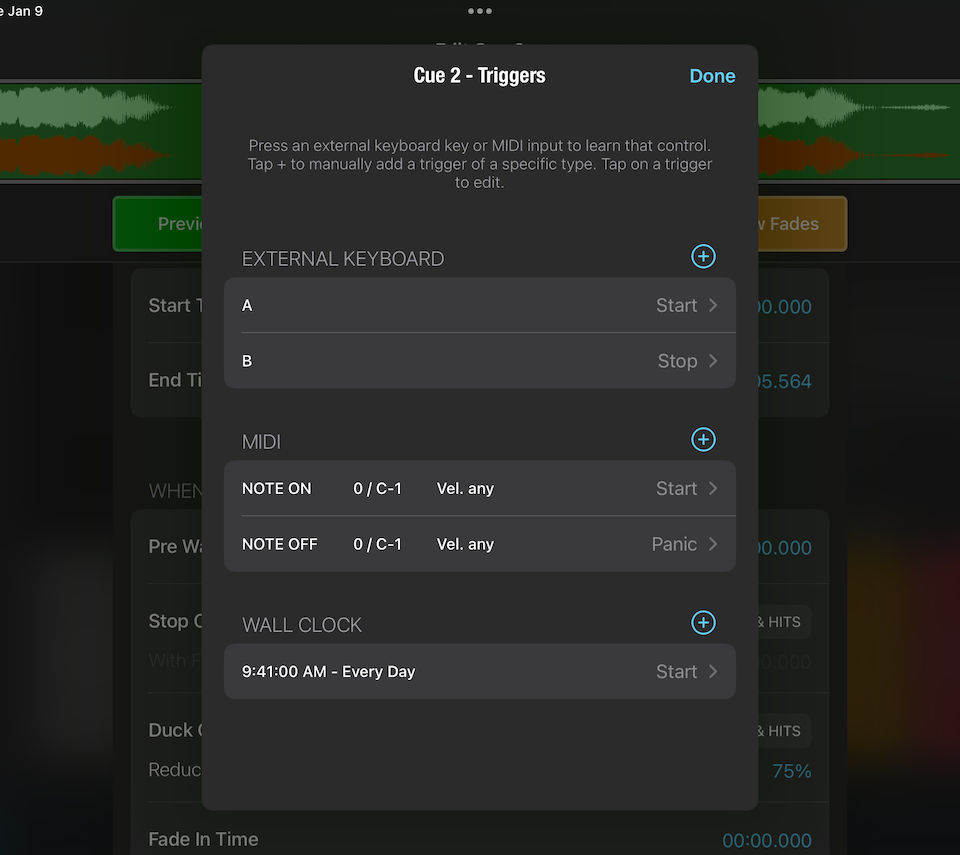
Cues can be assigned certain actions that can be triggered by External Keyboard hotkeys or MIDI commands, or actions that can be scheduled to run automatically at a specific time of day (“Wall Clock”). Triggers are active any time a show is open and in Show Mode.
You can have multiple triggers in the same cue. Each trigger can perform one of three actions:
- Start. Starts the cue playing. If the cue is already playing, the cue will restart.
- Panic. Stops the cue, fading out over the duration specified in Show Settings > Panic Duration.
- Stop. Stops the cue immediately without fading out.
While the Triggers screen is open, you can press a key on an external keyboard or send a MIDI message to Go Button to “learn” that input, i.e. capture it as a new trigger. You can also tap on the blue ”+” button to add a trigger of a specific type.
New triggers default to the Start action, with the exception of a new MIDI trigger using “Note Off”, which defaults to Panic. You can tap on a trigger to edit its settings, including changing which action that trigger will perform when activated. In MIDI triggers, you can also further refine the range of values accepted for MIDI Note On, Note Off, and Control messages. In Wall Clock triggers, you can select which days of the week the trigger should run.
To disable a trigger, you can set its action to ”- no action / disabled -”. To completely remove a trigger, you can swipe-to-delete on the Triggers screen, or you can tap the Delete Trigger button at the bottom of the Trigger Edit screen.
Important: It is possible to create triggers that use the same keystrokes or MIDI commands as one of your Remote Control profiles. Take care when designing your triggers to ensure that you avoid conflicts with your active remote profile.
Disable Cue
Disabling a cue will cause Go Button to skip over it entirely in the cue list, effectively behaving as though the cue is not there. This can be desirable for experimenting with alternate versions of cue in your show or for quickly removing a cue that you may wish to reinstate later.
Renumbering Cues
By default, new shows have the Automatically Number Cues setting enabled in Show Settings, and Go Button updates your cue numbers for you as needed when adding, inserting, deleting, or reordering cues in your show.
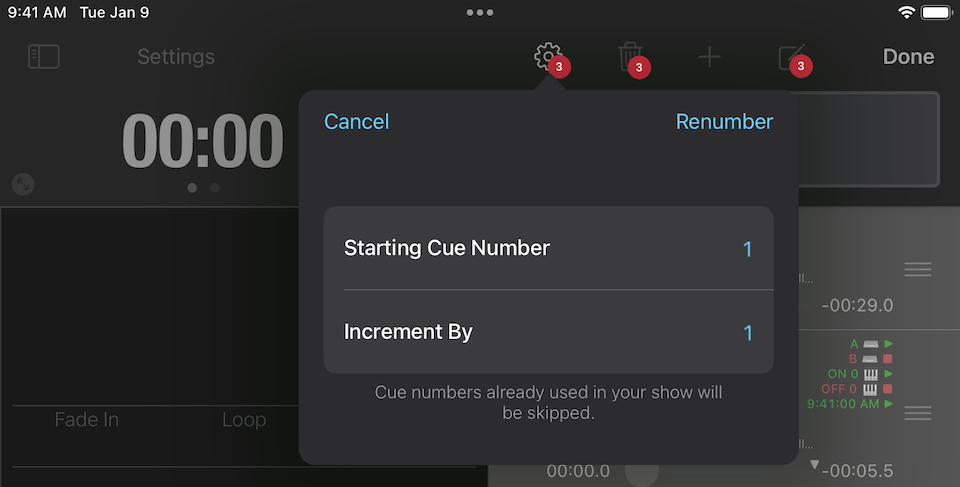
When Automatically Number Cues is disabled, you can manually change cue numbers when the player is in Edit Mode. Select one or more cues, tap the Gear button, and then select the Renumber Cues… option. Enter a Starting Cue Number and an Increment By value, then press Renumber.
Note that you can enter fractional numbers in both fields, such as a starting cue number of 1.5 and an increment value of 0.1.
Entering Time Formats
Time values in Go Button are displayed using the format (H:M)M:SS.000. Go Button also respects your device’s region format and will display time values using the date and decimal separators of your current locale.
You can type time values in many different ways, and Go Button will try to make sense of what you enter and format it accordingly.
- Whole numbers are interpreted as seconds.
- Decimal values are interpreted as milliseconds.
- Values of 60 seconds or greater are formatted as minutes & seconds.
- Values of 60 minutes or greater are formatted as hours & minutes.
Here are some examples:
| Entering… | becomes… | |
|---|---|---|
| 5 | 00:05.000 | 5 seconds. |
| 12.345 | 00:12.345 | 12.345 seconds |
| 61.2 | 01:01.200 | 1 minute, 1.2 seconds |
| 4:07 | 04:07.000 | 4 minutes, 7 seconds |
| 1:02:00.3 | 1:02:00.300 | 1 hour, 2 minutes, 0.3 seconds |
Still have a question?
Our support team is always happy to help.


